Thursday, July 25, 2013

GF Blueberry Muffins


Recently we started our youngest on a Gluten Free diet.  And for the most part, I have been appalled by the GF options on the market.  Everything costs about 4 times what it's non-GF counterpart costs and tasted like a spoon full of sawdust.  When I bought GF cinnamon rolls, my oldest thought it tasted like chicken, because that's what you want your cinnamon rolls to taste like. 

I have been experimenting with GF recipes for baked goods and think I came up with a pretty great one!  Trying to compensate for the dryness of GF flours, I added butter, milk and fruit (I am pretty sure butter makes everything better).  The fruit Owen and I picked at a local berry farm.  We even rode our bikes up to it, I felt very French. 

Let's make some GF muffins! Oui, Oui!

Ingredients:
1/4 cup (or 1/2 stick) of butter
1/4 cup sugar
1 egg
1 cup Bisquik GF baking mix (if you use something else, you will need to add another 1/4 cup sugar and 1 tsp baking powder.  The Bisquik mix has sugar and leavener already added.) 
dash of salt
1/4 cup milk
1 cup blueberries
lemon zest

Makes 6 muffins


Directions:

Add butter and sugar to your mixer and blend on med-high until butter/sugar is fluffy, about 1-2 minutes.

Add the egg and combine.


Toss your berries with a bit of the flour.  This prevents them from sinking to the bottom of your muffin.  Set berries aside until the end. 

Add salt and half the flour to your mixer.  Combine. 

Add milk, combine.

Add remaining flour and beat until just combined. 

Add lemon zest and berries.  I use a spatula to gently combine.  I find the mixer paddle will crush the berries. 

Batter will be fairly thick, place it in a muffin tin.  I like to add a sprinkle of sugar to the tops to make them all sparkly because there isn't anything I love more than sparkles.  Bake at 350 degrees for 20-25 minutes or until golden on top and and a tooth pick comes out clean.  

Sunday, July 21, 2013

Sunday Suppers: Baked Ham with Mac Salad and Green Beans

I wanted to start a new feature on the blog, Sunday Suppers.  I often will make a big dinner with the idea to use that one meal to jump start several other meals through out the week.  Like this week's ham can turn into "lunch meat" that is wholesome and real instead of creepily uniform and hyper processed like deli meat.  It can also lead to a couple of dinners that are tailor made for busy week nights.

 Now when you head to the grocery store that big piece of meat may lead to a little bit of sticker shock.  However, think of it this way:  this $12 ham will roll into 2-3 dinners this week, provide sandwich fixins' for the week, and you'll be left with a big old ham bone for soup or beans at some point in the future.  And this recipe is Honey-Baked Ham store good; never again will I buy one of their $50 (!!!) hams.  

Some dinner ideas with left over ham include:
  1. Eggs Benedict.  I serve this at dinner time with a side of roasted asparagus or sauteed spinach.
  2. Ham and broccoli macaroni and cheese.  A complete dinner in one dish.
  3. Hawaiian pizza, see previous post, Picadillo Calazones for my pizza dough recipe.  
I have to say, my kids were excited about this ham.  Owen calls himself a "meatatrian" and Noah tried to haul the uncooked ham off the counter and take it to the dining room table!

Orange-Ginger Baked Ham 

Ingredients:
1 bone in ham (mine was about 6.5 pounds which is a pretty average size)
For the glaze:
1/2 heaping and packed cup of brown sugar
1 tbsp grill seasoning
1/2 tbsp grated fresh ginger **tip--buy a knob of ginger from the produce section, it will run you about $.30 and you can keep it in the freezer forever and just grate it frozen.
1/4 scant cup orange juice 

Directions:

Preheat your oven to 325 degreesRemove all packaging from ham and place it cut side down in a large pan.  
 
Cook for 20 minutes per pound.  My ham at 6.5 pounds cooked for 2 hours and 10 minutes.  30 minutes before cooking is finished remove from the oven to apply the glaze.

To glaze:  use a knife to carefully score the ham in both directions to allow glaze to penetrate the ham.

 Make the glaze by combining the brown sugar, orange juice, grill seasoning, and ginger to make a paste.  Slather over the top of the ham and return it to the oven for the final 30 minutes.
 
It will come out looking mahogany and lovely. 

 Now let's make some side dishes!

Macaroni Salad
 Ingredients:
8 oz or 1/2 box macaroni pasta
2 carrots, grated
1/2 bell pepper, finely diced

 
For dressing:
1/3 cup Mayo
1 tbsp red wine vinegar
2 tbsp sweet pickle relish
1 tsp sugar
several dashes tabasco to taste
salt and pepper  


Directions:  
 Boil the pasta according to package directions.  Drain and rinse in cold water,( this is the only time I would ever tell you to rinse your pasta! ).

I like to make the dressing in the bottom of the serving bowl, fewer dishes.  Add all the dressing ingredients and whisk, taste and adjust tabasco, salt and pepper.

 Add the cooked pasta, bell peppers, carrot and mix well with the dressing.  Cover and chill in the refrigerator for an hour or so before serving to fully chill and meld the flavors.  


Bacon Laced Green Beans
This recipe was an attempt to get Owen to eat a vegetable without making gag-face.  
Ingredients:
2 heaping cups of fresh or frozen green beans, if fresh, snap off ends
2 strips bacon, chopped
1/2 a large tomato, finely diced
splash of red wine vinegar
1/2 tsp honey
maybe a 1 tsp of olive oil

Directions:
Toss green beans in a pot of boiling water.  I only cook them for about 2 minutes (for fresh, maybe 3-4 if frozen) to maintain a bright color and crisp bean.  If you like yours more well done, keep them under longer.  Drain and set aside.

Saute chopped bacon over medium heat.  When crisp remove the bacon from the pan and set aside.  Admire your bacon fat in the pan, is it about 1 1/2 tsp?  If not, add the olive oil to make about 1 1/2 tsp of oil/fat total.  Add a splash of red wine vinegar, about 1 tsp and the honey.  Give it a quick whisk.

Increase the heat to medium high and add the green beans and tomato. Warm up the veggies and give the green beans a bit of a char, about 2 minutes.  Turn off the heat and add the bacon.  

Enjoy!  


Monday, July 15, 2013

GF Cauliflower "Mac and Cheese" Style


GF WTF?
The what and the why about Gluten Free.  Now, I am not a nutritionist, just a woman on her soap box.   Disclaimers aside, I don’t think wheat is inherently bad.  The current Gluten Free craze smacks of a fad diet trend, however I think some people do have a sensitivity to wheat/gluten.  The American diet is probably a little too wheat based, with too much nutritionally light breads and pastas ("ummmm, bread and pasta" said in Homer Simpson's voice). 

That said, we are trying out a Gluten Free diet for my youngest, Noah, who experiences autism.  Some children with autism see their tummy issues alleviated and an increase in their cognitive clarity on the diet.  So far, we have seen a happier tummy and a surprise consequence, an increase in the types of foods Noah will eat.  Now, instead of stuffing himself like a Thanksgiving turkey with bread, he is eating vegetables and meats.  

As we are new to this diet, I am still experimenting with the different products out there.  I have tried a few different GF flour mixes: Trader Joe’s rice based wasn’t terrible but not great, Winco bulk bin garbanzo bean flour made me want to cry, super gritty and awful flavor.  I will report back on our GF product findings.  

Now on to the main event:  

 GF Cauliflower "Mac and Cheese" Style 

As I said in my introduction about me, my family is super picky.  And unfortunately they cannot agree on what they like and what they dislike, with the exception of Cauliflower, they all hate it.  At the farmer's market the other night, I tried to talk them into chocolate/beet cupcakes with no success.  Our compromise was they would try a new cauliflower recipe.  Seriously, it is covered in cheese sauce, so how could it not be good?!  Serves 4 or so as a side dish.

Ingredients:
1 head cauliflower, or a bag of frozen cauliflower
2 tbsp butter
1 1/2 tbsp flour (using the Trader Joe's GF flour)
1 cup milk
1 cup cheese (I am using cheddar and smoked Gouda, that Gouda is my secret to great mac and cheese.  You can substitute Parmesan or just use a sharp cheddar.  If all you have is regular old cheddar, that will work, you may just want to add a little extra so your sauce doesn't just taste like milk.)  
1 squeeze of mustard, honey mustard or Tabasco  (optional)   

Directions:  
  • Cut cauliflower into small florets and boil on the stovetop for 5 minutes.  Drain cauliflower and set aside while you make the sauce. 
  • I used the same pot (save on dishes, yay!) melt the butter over medium heat.  When melted add the flour and make the roux.  Whisk the flour and butter until well combined and cooked for a minute.  
  • Add the milk and whisk.  Continue cooking over medium to medium-high heat.  It is imperative not to allow your milk to boil however, nothing good happens when you boil milk.  Cook for 3-5 minutes, whisking often until the milk mixture thickens.  
  • Add the cheese and  if you like an additional flavoring.  I added a squeeze of honey-mustard (thinking of my friend Amber and her love of honey mustard).  Add salt and pepper (I add a lot), kill the heat and whisk until the cheese is completely melted and the sauce is smooth.  
  • Add the cauliflower and combine.  If you are feeling decadent, add another sprinkle of cheese to the top. 
  • Transfer to a oven safe pan and put into a 375 oven for 30 minutes or until bubbly and golden on top.      


Super Easy Baby Back Ribs With a Fresh Corn Salad


Super easy and ribs aren't concepts that usually go together.  My friend and neighbor, Mark makes amazing ribs on the grill.  They take him all day.  This option seems out of my depth, both because I am too lazy to stand at the grill all day and don't feel like I possess the barbeque prowess to pull this technique off.  I have since mastered making my ribs in the oven with just a quick char on the grill.  They taste so, so good and are super simple.

Ingredients for the ribs:
Rack or racks of ribs (one rack for 3 of us was plenty, but my Dad can put away a rack himself, so adjust as necessary for your eaters)

Dry rub mix:  To be honest, I just get out my spices and start adding the ones that seem "barbequey".  Today for one rack that meant:
1/4 cup brown sugar
1 tsp fresh thyme
1 tablespoon grill seasoning
1/2 tsp smoked paprika
1/2 tsp cumin
1/2 tsp cayenne
1/2 tsp dry mustard
1/2 tsp garlic salt
(I am not adding salt and pepper because the grill seasoning has a lot of it)

Sauce:
I use whatever jarred barbeque sauce I was able to coupon for really cheap, but to make it my own I like to add jam.  I don't share this secret with my husband Geoff because for some reason fruit with meat makes him irrational.  Today I added homemade peach jam at a 2-to-1 ratio.  Other stone fruits or orange marmalade are really tasty too.  

 Make up 2 bowls of sauce, one to use on raw ribs, one to use on cooked.  In each bowl (again for one rack of ribs, please do the math on your own to figure out how much you'd need for more racks) combine 1/2 cup barbeque sauce, 1/4 cup jam.

Directions:
Preheat oven to 250 degrees.  Slather the ribs with the dry rub and put in the oven.  After 45 minutes add one of the bowls of barbeque sauce and coat the ribs.  Cook for another 45 minutes (for 1 1/2 hours total).  To test for doneness, carefully grab a hot rib bone and wiggle it.  You want it to wiggle to demonstrate the meat is "fall of the bone" tender.  Now add the second bowl of sauce if you like a "saucy" rib or you can save to serve along side.

Fresh from the oven
You can do the above early and just let the ribs hang out until you are ready for dinner.  Seriously, I got the ribs in the oven and left the house to go to my son's baseball practice, that is how easy and mostly hands off this recipe is.

To finish:  preheat your grill or broiler on high, and lightly char ribs on both sides, 2-5 minutes each side.

If your bbq sauce is gluten free, so is this recipe.

Now on to corn salad...

Fresh Corn Salad
 I make several variations of this salad, for today's I used:

Ingredients:
2 ears fresh corn
1/2 orange bell pepper
1/2 large tomato
1/4 cup sliced fresh basil
1 squeeze of lemon
1 tsp olive oil
1 tsp honey
salt and pepper

Directions:
Prepare corn by adding to boiling water for 2 minutes.  Remove from water and allow to cool.  Cut kernels off the cob and add to the bowl.  Dice bell pepper, tomato and basil and add to bowl.  Add lemon, olive oil, honey and salt and pepper.  Mix it all together and you have a simple, fresh, summer side dish.

Variations:  Think of corn as your base and really you can change up the flavors so many ways.  In the winter I will just defrost frozen corn and use it in place of the fresh corn.  I sometimes go more southwestern with canned and rinsed black beans, sliced avocado, cilantro, peppers, tomatoes and lime instead of lemon in the dressing.  Oh, so good. 

Friday, July 12, 2013

Berry Crisp

My friend Susan came over the other day with a lovely berry cobbler.  This reminded me that I haven't really eaten my fill of berry-type desserts this summer.  I thought I would try my hand at a berry crisp.  The difference between a cobbler and a crisp is all in the cake/topping part.  Both have the fruit on the bottom, a cobbler is more of a biscuit/cake type top and a crisp is more streusel like. 

Berries aren't always the cheapest fruit to use for anything, but this is a case of freezer clean out.  I had strawberries and blueberries in there from previous purchases and a handful of fresh raspberries that were on their last day before they'd just be mush.  This recipe would work with whatever fruit you have on hand (except for maybe bananas, very little good comes from bananas).  Some great ideas would be stone fruits (peaches, plums, apricots) either mixed together or combined with berries, or even your classic grocery store staple, apples.

frosty berries


Ingredients for fruit portion:
4 cups fruit (I used strawberries and blueberries straight from the freezer and raspberries)
2 tsp flour
1 squeeze lemon

For topping:
1 cup oats (I used Snoqualmie Falls Lodge Oatmeal that I got at the Grocery Outlet)
1/2 cup flour
1/2 cup brown sugar
1/4 cup plus 1 tbsp butter (just over half a stick)
dash of salt

Directions:
berries ready to be topped
In your baking vessel (an 8x8 pan would be a good one to use if you don't have a pretty red ceramic dish from the Salvation Army like I do) toss in your berries, 2 tsp of flour and a squeeze from a slice of lemon.

A controversial move, I know, but I am not sugaring my berries.  These berries were picked in season and the strawberries are the super sweet Oregon variety.  If I were making this with early, tart strawberries, I might add  a tablespoon or 2 of sugar in with the fruit.   

topping

 Please notice the pretty kitchen towel.  A gift from my Mom.  All my decent kitchen towels are from my Mom.  Apparently the fact that I think its perfectly acceptable to just cut up old towels and use them in the kitchen makes her sad.

In a separate bowl combine all the topping
 ingredients, working the room temperature butter in with a fork or your fingers. 

Goes in looking like this...

Add the topping to the top of the berries, leveling it out.  Place in a 350 degree oven for around 30-45 minutes.  If you are using frozen fruit, like I did, you'll be at the 45 minute end of the time frame.  You want to pull it out of the oven when the top is golden brown and the fruit is bubbling up around the edges. It is absolutely perfect served warm or cold with vanilla ice cream or whipped cream.


And comes out looking like this. 


Thursday, July 11, 2013

Picadillo Calazones

All of my recipes are intended to utilize what I have on hand.  Feel free to substitute ingredients for what you have and what you like.  I promise, my feelings won't be hurt.  This recipe started because after having my girlfriends over to watch porn "True Blood" and eat turkey burgers I realized I had way to much meat mixture leftover.

To prepare these cross-cultural calazones (HA!  my spell check tried to turn "calazones" into "lazybones".  Apparently calazones are too multicultural for Google) you need to prepare a few things:

First--Pizza Dough

You could absolutely buy this ready made, but if you have a few hours to let it rise, it is incredibly cheap to make yourself.

ingredients:
1 tsp yeast
1 tsp sugar
1/2 tsp salt
1 cup lukewarm water
2 cups flour
splash of oil (I like olive for this)

directions:
In the bottom of your mixer or in a bowl combine sugar, yeast and lukewarm water.  Let it sit or proof for a few minutes.  Then add your flour and salt, and mix with the mixer or by hand for a few more minutes.  Lift the dough out of the bowl for a moment and add a dizzle of oil to the bottom of the bowl.  Add the dough and turn in the oil to coat.  Congratulations!  you've made pizza dough.  Cover with plastic wrap or a clean towel.  Let it rise until about double in size, maybe 2 hours.   The dough can also rise in the fridge overnight and just remove about an hour before using.

Notice the bubbles on top of the dough, that means it ready. While the dough rises or whenever you like, make the meat mixture.


Second--Turkey mixture

Ingredients:
20 oz package of ground turkey
1/8 cup of prepared bbq sauce (you won't really taste it, it just does good things in there)
Heaping teaspoon grill seasoning
2 tablespoons chives (or parsley would work I just have an abundance of chives in my garden)
¼ cup grated onion

Directions:  combine all the above ingredients just as you would to make hamburgers (which is what I did and how these left overs came to be).  

Third--Picadillo Calazones

Remaining ingredients:
6-8 cloves of roasted garlic or 2-3 cloves fresh garlic, diced
browning turkey
1/4 cup finely diced onion
1 tbsp oil
1 tsp smoked paprika
1 tsp chile powder 
1 tsp dried oregano
1 tbsp tomato paste
1 loose cup of shredded cheese ( I used cheddar and mozzarella)   

Directions:


Saute garlic and onion in the oil for a minute or 2, over med-high heat, until starting to turn translucent.  Add the meat mixture to brown.  When your turkey is cooked through, drain the fat and add the tomato paste, smoked paprika, chile powder, and oregano.  Allow these ingredients to toast and cook and fully incorporate with the meat mixture, 2 minutes or so.  
3 balls of pizza dough
   
Now we are ready to assemble these beauties.  
Divide your pizza dough into 2 Whoa-you-really-are-hungry portions, 3 still-really-big portions, or 4 normal person sized portions.    You can see what I went with. 


filled calazone
Roll each ball out into a disk about 1/4-1/8 inch thick.  Add a healthy, heaping scoop of the meat mixture and a slightly smaller, yet still super yummy handful of cheese to one side of each disk.  Leave about 1/2 inch edge to allow room to fold.  To fold, fold over empty side like you are making a quesadilla.  Pinch and turn the edges to seal, so all the good stuff doesn't run out as you bake.  Fork a few steam holes in the top.  Repeat with each calazone.


folded and ready for the oven
Ahh, look, Daddy, Mama and Baby Bear!  Add a touch of oil to the bottom of your cookie sheet just so they don't stick.  Place into a preheated 425 degree oven and bake for around 20 minutes.  They should go in looking like this


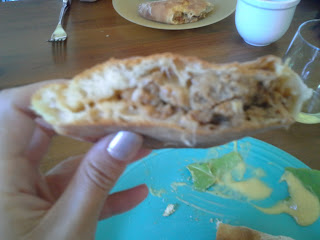
 And come out looking like this.  Yummy.  And because dinner can't just be all meat pies, I made a salad.  My garden lettuce is going crazy, so my salad is a simple lettuce, with cucumber and tomatoes from the farmer's market.